

微服务 将应用和服务分解成更小的、松散耦合的组件,微服务可以在”自己的程序”中运行,并通过轻量级设备与HTTP型API进行沟通,让系统尽可能快地响应变化
主要特点 组件化、松耦合、自治、去中心化、独立部署运行和扩展、独立开发和演化、独立团队和自治、独立实例个数、独立编程语言
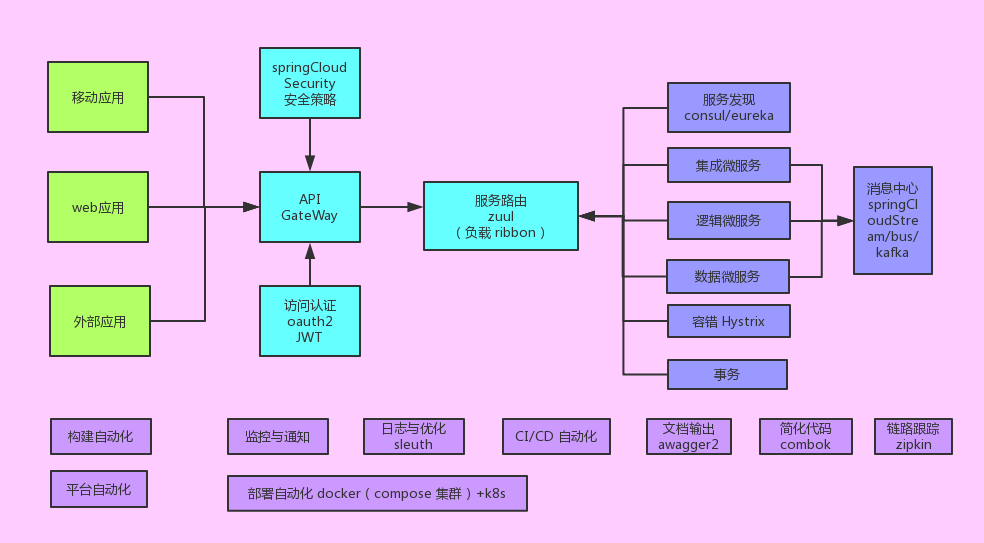
主流框架 Spring Cloud,Dubbo
Spring Cloud 基于springboot的简化了分布式系统基础设施的开发一系列框架的有序集合。
主要组件:服务发现注册、配置中心、消息总线、负载均衡、断路器、数据监控等
sys_eureka      注册中心
sys_client      客户端
sys_feign       feign均衡负载
sys_ribbon      ribbon均衡负载
sys_turbine     断路器聚合监控
sys_config      配置中心
sys_zipkin      日志追踪
sys_zuul        路由
demo_jpa        jpa的客户端
demo_koa2       koa2的客户端
demo_ssm        ssm的客户端
<mirror>
  <id>nexus-aliyun</id>
  <name>Nexus aliyun</name>
  <mirrorOf>central</mirrorOf>
  <url>http://maven.aliyun.com/nexus/content/groups/public</url>
</mirror>
<profile>
    <id>nexus-aliyun</id>
    <repositories>
        <repository>
            <id>nexus-aliyun</id>
            <url>http://maven.aliyun.com/nexus/content/groups/public</url>
            <releases>
                <enabled>true</enabled>
            </releases>
            <snapshots>
                <enabled>true</enabled>
            </snapshots>
        </repository>
    </repositories>
    <pluginRepositories>
        <pluginRepository>
             <id>nexus-aliyun</id>
             <url>http://maven.aliyun.com/nexus/content/groups/public</url>
             <releases>
                <enabled>true</enabled>
             </releases>
             <snapshots>
                <enabled>true</enabled>
             </snapshots>
        </pluginRepository>
    </pluginRepositories>
</profile>
</profiles>
<activeProfiles>
  <activeProfile>nexus-aliyun</activeProfile>
</activeProfiles>
@echo off
for /f %%i in ('dir /b /ad') do (
start cmd /k "cd %%i&&title 这是%%i&&java -jar target/jun-1.0-SNAPSHOT.jar"
)
#pause
#start cmd /k "cd computeService&&echo 这是提供服务&&java -jar target/jun-1.0-SNAPSHOT.jar --server.port=2223"
@echo off
for /f %%i in ('dir /b /ad') do (
start cmd /k "cd %%i&&mvn package&&echo 这是%%i&&title 这是%%i&&java -jar target/jun-1.0-SNAPSHOT.jar"
)
#pause
#start cmd /k "cd computeService&&echo 这是提供服务&&java -jar target/jun-1.0-SNAPSHOT.jar --server.port=2223"
@echo off
for /f %%i in ('dir /b /ad') do (
start cmd /C "cd %%i&&echo 这是%%i&&rmdir /s/q 123"
)
#pause
TASKKILL /F /IM cmd.exe /T
#@echo off
#for /f %%i in ('dir /b /ad') do (
#echo 管理员:这是%%i
#taskkill /FI  "WINDOWTITLE eq 管理员: 这是%%i*" /IM cmd.exe /F
#pause
#)
pom.xml:
  <parent>
     <groupId>org.springframework.boot</groupId>
     <artifactId>spring-boot-starter-parent</artifactId>
     <version>1.5.2.RELEASE</version>
     <relativePath/>
 </parent>
 <groupId>com.jun</groupId>
 <artifactId>springCloud</artifactId>
 <version>1.0-SNAPSHOT</version>
 <packaging>pom</packaging>
 <name>springCloud</name>
 <properties>
    <project.build.sourceEncoding>UTF-8</project.build.sourceEncoding>
    <project.reporting.outputEncoding>UTF-8</project.reporting.outputEncoding>
    <java.version>1.8</java.version>
 </properties>
 <dependencies>
     <dependency>
         <groupId>org.springframework.boot</groupId>
         <artifactId>spring-boot-starter-test</artifactId>
         <scope>test</scope>
     </dependency>
     <dependency>
         <groupId>org.springframework.boot</groupId>
         <artifactId>spring-boot-starter-web</artifactId>
     </dependency>
 </dependencies>
 <dependencyManagement>
     <dependencies>
         <dependency>
             <groupId>org.springframework.cloud</groupId>
             <artifactId>spring-cloud-dependencies</artifactId>
             <version>Brixton.RELEASE</version>
             <type>pom</type>
             <scope>import</scope>
         </dependency>
     </dependencies>
 </dependencyManagement>
<!-- maven 打包插件-->
<build>
    <finalName>springCloud</finalName>
    <plugins>
        <plugin>
            <groupId>org.springframework.boot</groupId>
            <artifactId>spring-boot-maven-plugin</artifactId>
        </plugin>
    </plugins>
</build>
<!-- 阿里云私服-->
 <repositories>
     <repository>
         <id>nexus-aliyun</id>
         <name>Nexus aliyun</name>
         <url>http://maven.aliyun.com/nexus/content/groups/public</url>
     </repository>
 </repositories>
选中项目B->新建maven Module子项目: sys_eureka、sys_client、sys_feign、sys_ribbon、sys_config、sys_zipkin、sys_zuul、demo_jpa、demo_koa2、demo_ssm
 <parent>
     <artifactId>springCloud</artifactId>
     <groupId>com.jun</groupId>
     <version>1.0-SNAPSHOT</version>
 </parent>
 <modelVersion>4.0.0</modelVersion>
 <artifactId>sys_eureka</artifactId>
 <packaging>jar</packaging>
 <name>eureka</name>
 <dependencies>
     <!--eureka server -->
     <dependency>
         <groupId>org.springframework.cloud</groupId>
         <artifactId>spring-cloud-starter-eureka-server</artifactId>
     </dependency>
     <!-- 安全 -->
     <dependency>
         <groupId>org.springframework.boot</groupId>
         <artifactId>spring-boot-starter-security</artifactId>
     </dependency>
 </dependencies>
//服务注册中心
@EnableEurekaServer
@SpringBootApplication
//相当于@Configuration、@EnableAutoConfiguration(自动配置)和  @ComponentScan
public class EurekaApplication {
 public static void main(String[] args) {
     SpringApplication.run(EurekaApplication.class, args);
     // new SpringApplicationBuilder(Application.class).web(true).run(args);
     //SpringApplication.run(Application.class, "--server.port=1112");
 }
}
//F11或S右键 Run Java Application 启动应用
//部署spring boot应用->工程目录:mvn package->进入target目录->java -jar simple.jar --server.port=8081  >log8081.log
spring.application.name=eureka
#服务注册中心的端口
server.port=1111
eureka.instance.hostname= localhost
#是否注册自身到eureka服务器
eureka.client.register-with-eureka=false
#是否从eureka服务器获取注册信息
eureka.client.fetch-registry=false
#eureka.client.serviceUrl.defaultZone=http://${eureka.instance.hostname}:1112/eureka/,http://${eureka.instance.hostname}:1113/eureka/
eureka.client.serviceUrl.defaultZone=http://${eureka.instance.hostname}:${server.port}/eureka/
#是否开启自我保护模式,默认为true
eureka.server.enable-self-preservation=true
eureka.instance.appname=eureka
#eureka server清理无效节点的时间间隔,默认60000毫秒
eureka.server.eviction-interval-timer-in-ms=6000
#eureka server在这个时间内若没收到client下一次心跳,则将移除该instance默认为90秒
eureka.instance.lease-expiration-duration-in-seconds=60
http://localhost:1111/创建提供服务的客户端,并向服务注册中心注册自己。
计算功能的微服务模块,传入参数a和b,返回a + b结果
 <!-- 服务注册-->
 <dependency>
     <groupId>org.springframework.cloud</groupId>
     <artifactId>spring-cloud-starter-eureka</artifactId>
 </dependency>
@RestController
public class Controller {
 private final Logger logger = Logger.getLogger(getClass().getName());
 @Autowired
 private DiscoveryClient client;
 //    http://localhost:2222/add?a=10&b=20
 //通过DiscoveryClient对象,在日志中打印出服务实例的相关内容
 @RequestMapping(value = "/add", method = RequestMethod.GET)
 public Integer add(@RequestParam Integer a, @RequestParam Integer b) {
     ServiceInstance instance = client.getLocalServiceInstance();
     Integer r = a + b;
     logger.debug("/add, host:" + instance.getHost() + ", service_id:" + instance.getServiceId() + ", result:" + r);
     return r;
 }
 //    http://localhost:2222/hi?name=forezp
 @Value("${server.port}")
 String port;
 @RequestMapping("/hi")
 public String home(@RequestParam String name) {
     logger.debug("hi " + name + ",i am from port:" + port);
     return "hi " + name + ",i am from port:" + port;
 }
}
@SpringBootApplication
//服务注册客户端
@EnableEurekaClient
//@EnableDiscoveryClient
//激活Eureka中的DiscoveryClient实现
public class ClientApplication {
 public static void main(String[] args) {
//        SpringApplication.run(ClientApplication.class, args);
     new SpringApplicationBuilder(ClientApplication.class).web(true).run(args);
 }
}
spring.application.name=compute-service
server.port=2222
eureka.client.serviceUrl.defaultZone=http://localhost:1111/eureka/
#eureka.instance.hostname=localhost
#eureka.instance.metadata-map.instanceId=${spring.application.name}:${spring.application.instance_id:${random.value}}
#eureka.instance.instance-id=
#eureka.instance.prefer-ip-address=true
eureka.instance.lease-expiration-duration-in-seconds=1
eureka.instance.lease-renewal-interval-in-seconds=1
eureka.client.fetchRegistry= true
eureka.client.registry-fetch-interval-seconds=1
http://localhost:1111/http://localhost:2222/add?a=10&b=20http://localhost:2222/hi?name=forezpsys_eureka 模块
<!-- 安全 -->
<dependency>
    <groupId>org.springframework.boot</groupId>
    <artifactId>spring-boot-starter-security</artifactId>
</dependency>
# 安全认证的配置
#security.basic.enabled=false
security.user.name=admin
security.user.password=123
#eureka.client.serviceUrl.defaultZone=http://admin:123@${eureka.instance.hostname}:1112/eureka/
sys_client模块
eureka.client.serviceUrl.defaultZone=http://admin:123@localhost:1111/eureka/
http://localhost:1111/C:\Windows\System32\drivers\etc127.0.0.1 eureka-server-peer1
127.0.0.1 eureka-server-peer2
127.0.0.1 eureka-server-peer3
sys_eureka 模块
spring.profiles=peer1
eureka.instance.hostname=eureka-server-peer1
eureka.client.serviceUrl.defaultZone=http://admin:123@eureka-server-peer2:1112/eureka/,http://admin:123@eureka-server-peer3:1113/eureka/
创建配置文件 application-2.properties
spring.application.name=eureka
server.port=1112
#自己是eureka server,禁止直接注册自己
eureka.client.register-with-eureka=false
eureka.client.fetch-registry=false
spring.profiles=peer2
eureka.instance.hostname=eureka-server-peer2
eureka.client.serviceUrl.defaultZone=http://admin:123@eureka-server-peer1:1111/eureka/,http://admin:123@eureka-server-peer3:1113/eureka/
eureka.server.enable-self-preservation=true
eureka.instance.appname= eureka
eureka.server.eviction-interval-timer-in-ms=1000
security.user.name=admin
security.user.password=123
创建配置文件 application-3.properties
spring.application.name=eureka
server.port=1113
#自己是eureka server,禁止直接注册自己
eureka.client.register-with-eureka=false
eureka.client.fetch-registry=true
spring.profiles=peer3
eureka.instance.hostname=peer3
eureka.client.serviceUrl.defaultZone=http://admin:123@eureka-server-peer1:1111/eureka/,http://admin:123@eureka-server-peer2:1112/eureka/
eureka.server.enable-self-preservation=true
eureka.instance.appname= eureka
eureka.server.eviction-interval-timer-in-ms=1000
security.user.name=admin
security.user.password=123
打包 sys_eureka
进入工程目录:mvn package
启动sys_eureka
进入工程的target目录->
java -jar simple.jar --server.port=1111>log1111.log
java -jar simple.jar >log1111.log
java -jar simple.jar --spring.config.name=application-2 >log1112.log
java -jar simple.jar --spring.profiles.active=peer3 >log1113.log
http://localhost:1111/http://localhost:1112/http://localhost:1113/